Digging into Denoising Autoencoders
A first-year student's journey with these finicky algorithms
Introduction
The past four months have been a time of learning and growth. My time at the University of Waterloo served as a place where I could pursue areas that interest me and this led me to join WatAI’s cybersecurity team. Since this is a large project, the team was divided into sub-teams, I worked on the neural networks team, where I implemented a common deep learning algorithm: a denoising autoencoder.
What is a Denoising Autoencoder
An autoencoder is a type of neural network that tries to compress and decompress some input data. Like when you zip a folder on your computer, except the autoencoder automatically learns the most suitable compression algorithm.
Since the layers are symmetrical, the neural network is split into two sections: the encoder and the decoder. The layer in between is known as the hidden layer.
A denoising autoencoder is a specific type of autoencoder. Its input data is artificially distorted by adding some noise. The autoencoder’s job is to:
‘Squeeze’ out the noise (in the funnel-like encoder).
Find a compressed version of the image (in the hidden layer).
Recreate the undistorted image (in the expanding decoder).
Implementation and Testing
The neural network that was used to reconstruct the noiseless data had one hidden layer initially. The goal was to construct a simple neural network as quickly as possible and modify the model while plotting learning and error curves. This meant selecting hyperparameters, activation, and loss functions quickly. Then, error, bias, and variance could all be removed while tuning the model.
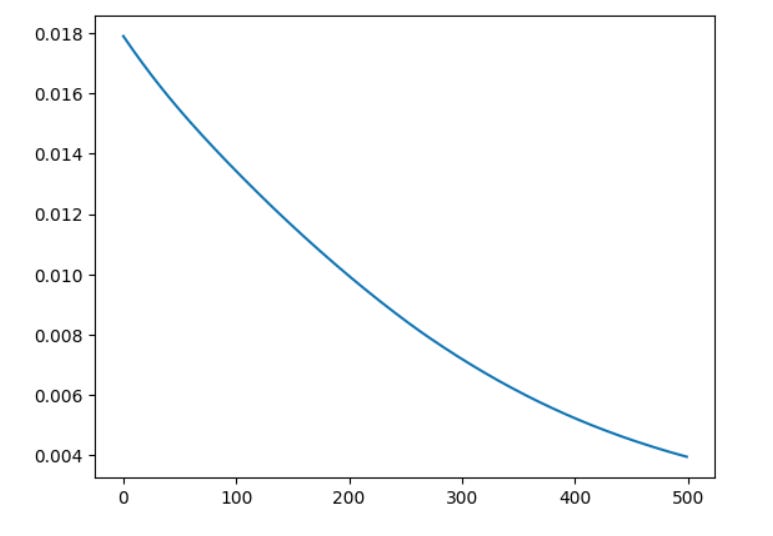
After creating a simple network architecture, the ADAM optimizer was used in conjunction with mean squared error loss. Then, a learning curve was created to show the decrease in error as iterations of ADAM were performed on the model.
This curve was not as smooth as it should have been and was almost cyclical in nature. This was made it apparent that the data needed normalization. Normalization means that the data points needed to be adjusted so that they fit into a smaller range.
After this was done, the curve demonstrated the decrease in error much more neatly. It is also apparent that the error of the model was incredibly low, which could have been a sign of the model overfitting.
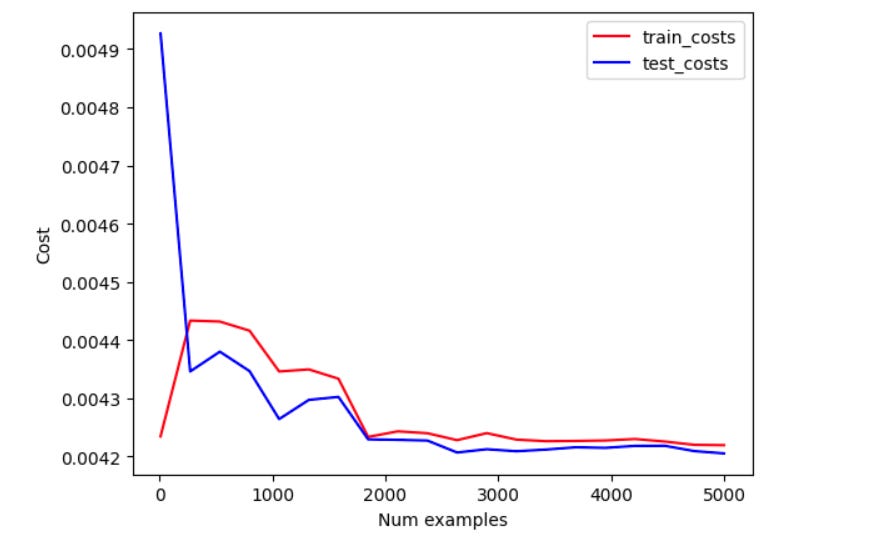
To check for this, a learning curve was created to show the difference between the train/test cost based on dataset size. It was clear that the model had too much bias as the test cost and train cost were both equally high and were similar.
It’s possible to reduce bias by changing around hyperparameters and the capacity of the model. However, for a first project, this suffices to show the basics of implementing a deep learning model.
What I learned
Through building this autoencoder, the most crucial skill I learned was the machine learning development cycle. I learned how machine learning models are crafted, and their components. I learned how to test them and how to read learning curves.
On top of learning some new technical skills, I also learned what working on a student design team is like. The projects no longer feel like the small video games I made as a child. Instead, they are larger and feel like they have a purpose.
Cybersecurity is a new issue that has quickly become necessary for people to protect their data. The work that this design team is doing is crucial for cybersecurity in the future and is necessary going into a future where the internet is essential for almost everything we do.
Next Steps
While I learned a lot developing this neural network, there’s a lot more coding and researching I need to do before I can call myself proficient at machine learning.
This will include joining a different sub-team for the next term and continuing to improve my skills in other areas of machine learning.
Overall, working on this design team has been one of the best experiences I’ve had as a first year and I am excited to see what the future holds for this design team!


